

Transform your living space with this stunning floral motif pillow that brings handmade elegance to any room
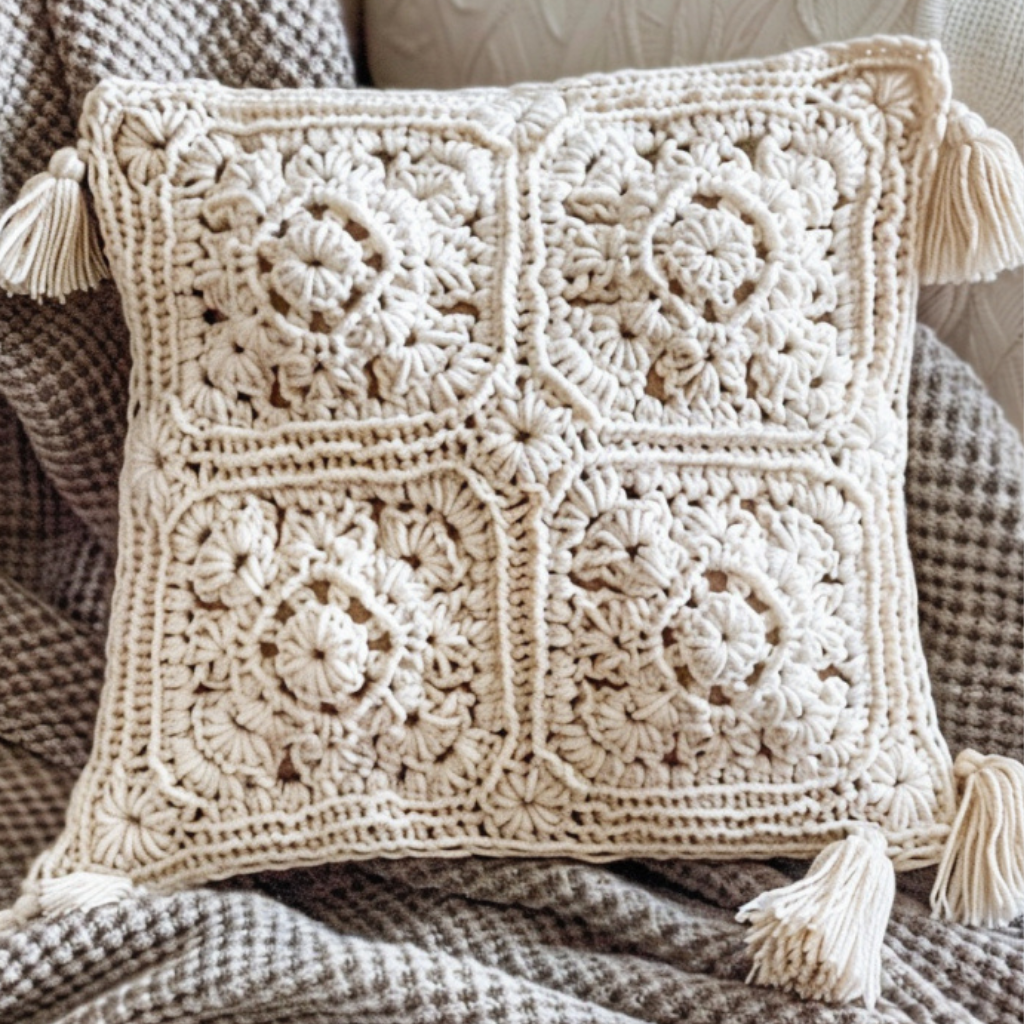
There’s something irresistibly cozy about handmade home decor that tells a story. This boho granny square pillow cover crochet pattern captures the timeless appeal of traditional granny squares while adding contemporary flair through its intricate floral motifs and playful tassel corners. Whether you’re decorating your first apartment or refreshing a well-loved living room, this pillow cover brings instant warmth and personality to any space.
The four-square design showcases different floral patterns within each granny square, creating visual interest while maintaining the cohesive beauty that makes granny square projects so beloved. The neutral cream colorway ensures this piece will complement any existing decor, while the handmade tassels in each corner add that perfect bohemian touch that makes your space feel curated and special.
This isn’t just another throw pillow – it’s a showcase piece that demonstrates your crochet skills while creating something both beautiful and functional for your home.
Pattern Overview: Where Traditional Meets Trendy
This granny square pillow cover measures approximately 16″ x 16″, making it perfect for standard throw pillows or pillow forms. The design features four large granny squares, each containing a unique floral motif that creates stunning texture and visual depth.
What makes this pattern particularly special is the combination of techniques used to create each square. You’ll work with traditional granny square construction methods while incorporating more complex floral elements like layered petals, dimensional centers, and intricate lacework details. The squares are joined using a decorative border that frames each motif beautifully.
The tassel embellishments at each corner aren’t just decorative – they’re an integral part of the design that adds movement and texture. Made from the same yarn as the pillow cover, they create perfect visual balance while adding that signature boho aesthetic that’s so popular in contemporary home decor.
The construction method involves working each square individually, then joining them with a connecting border, and finally adding the envelope-style back closure that makes the pillow cover removable and washable. This approach makes the project perfect for intermediate crocheters who want to practice joining techniques while creating something substantial for their home.
Skill Level: Intermediate
Estimated Time: 18-25 hours
Finished Size: 16″ x 16″ pillow cover
Construction Method: Four joined granny squares with envelope back
Complete Materials List
Yarn Requirements
- Primary Yarn: 650-750 yards of worsted weight yarn (Category 4)
- Fiber Recommendation: Cotton or cotton blend for durability and easy care
- Specific Suggestions:
- Lion Brand 24/7 Cotton (Ecru)
- Bernat Cotton-ish (Natural)
- Caron Simply Soft (Off White)
- Red Heart With Love (Eggshell)
- Color Notes: Natural, cream, or off-white shades work beautifully, but this pattern is stunning in any solid color
Hook & Notions
- Primary Hook: Size H/8 (5.0mm) crochet hook
- Tapestry Needle: Large eye for joining squares and weaving ends
- Stitch Markers: 4-6 removable markers for keeping track of rounds
- Sharp Scissors: For clean yarn cuts and tassel trimming
- Measuring Tape: Essential for checking square dimensions
- Pins: For blocking squares to perfect measurements
Additional Supplies
- 16″ x 16″ Pillow Insert: Down alternative or polyester fiberfill
- Cardboard: 4″ square for making uniform tassels
- Blocking Mats: Optional but recommended for professional results
- Steam Iron: For final pressing if using natural fibers
Optional Embellishments
- Contrast Color: For highlighting floral centers (50 yards)
- Metallic Thread: For subtle sparkle in flower centers
- Beads: Small pearl or wooden beads for flower centers
Sizing & Fit Guide
This pattern is designed specifically for standard 16″ x 16″ throw pillows, which are the most common size for decorative pillows. The finished cover measurements account for the slight stretch needed for easy insertion and removal of the pillow form.
Finished Measurements
- Cover Dimensions: 16″ x 16″ (front panel)
- Individual Squares: 7.5″ x 7.5″ before joining
- Joined Squares: 15″ x 15″ before border
- Final Border: Adds 0.5″ all around for 16″ finished size
- Tassel Length: 3-4 inches from corner
Fit Considerations
The envelope-style back closure overlaps by 4 inches, ensuring the pillow form stays securely inside while allowing easy removal for washing. The slight negative ease in the design keeps the pillow cover taut and prevents sagging or wrinkling.
Gauge Information
Critical Gauge: 4 stitches and 2 rounds = 1 inch in double crochet
Since this is a home decor item, gauge is less critical than for garments, but maintaining consistent tension will ensure all four squares are identical in size. Work a small gauge swatch using the floral motif center to check your tension before beginning.
Detailed Technique Breakdown
This pattern combines several intermediate-level techniques that create its distinctive appearance and professional finish:
Primary Stitches Used
- Double Crochet (dc): Main stitch for granny square construction
- Chain Spaces: Create the classic granny square openwork
- Single Crochet (sc): Used for tight joins and edging
- Half Double Crochet (hdc): Adds texture variation in floral motifs
- Treble Crochet (tr): Creates height in dimensional flower petals
Advanced Techniques Required
The floral motif centers require understanding of working in rounds while creating dimensional petals that layer naturally. You’ll master techniques for creating raised elements that give the flowers their realistic appearance.
Square joining methods include both the join-as-you-go technique and the traditional sew-together method. The pattern includes instructions for both approaches so you can choose your preferred method.
Tassel construction involves consistent wrapping techniques and even trimming for professional-looking results. The attachment method ensures tassels stay secure through regular use and washing.
This pattern offers excellent skill-building opportunities in color work, dimensional construction, and professional finishing techniques that will enhance all your future crochet projects.
Complete Step-by-Step Pattern Instructions
Abbreviations
- ch = chain
- sc = single crochet
- hdc = half double crochet
- dc = double crochet
- tr = treble crochet
- sl st = slip stitch
- st(s) = stitch(es)
- sp = space
- rep = repeat
- rnd = round
- beg = beginning
Gauge Swatch
Ch 4, join to form ring. Rnd 1: Ch 3 (counts as dc), 11 dc in ring, join. (12 dc) Rnd 2: Ch 3, dc in same st, ch 1, 2 dc in next st, rep around, ch 1, join. Block and measure. Should equal 2″ across.
Granny Square A – Rose Motif
Foundation Ring: Ch 6, join to form ring.
Rnd 1 (Flower Center): Ch 1, 12 sc in ring, join. (12 sc)
Rnd 2 (Inner Petals): Ch 3, sl st in 2nd ch from hook, ch 1, sl st in next sc, rep around. (6 petals)
Rnd 3 (Working behind petals): Ch 4, sc around post of sc from Rnd 1 (behind petal), rep around. (6 ch-4 loops)
Rnd 4 (Outer Petals): In ch-4 loop work: sc, hdc, 3 dc, hdc, sc, rep in each loop. (6 larger petals)
Rnd 5 (Granny Square Base): Ch 6, sc around post between petals, rep around. (6 ch-6 loops)
Rnd 6: In ch-6 loop work: 3 sc, ch 3, 3 sc, rep around, join.
Rnd 7 (Corner Formation): Ch 3 (counts as dc), 2 dc in same sp, ch 1, 3 dc in next sp, ch 1, 3 dc in next sp, ch 2, 3 dc in same sp (corner made), rep around omitting final 3 dc, join.
Rnd 8: Ch 3, dc in each dc and ch-1 sp, (2 dc, ch 2, 2 dc) in corner ch-2 sp, rep around, join.
Rnd 9: Rep Rnd 8. Fasten off.
Granny Square B – Daisy Motif
Foundation Ring: Ch 4, join to form ring.
Rnd 1: Ch 1, 8 sc in ring, join. (8 sc)
Rnd 2: Ch 4, tr in next sc, ch 4, sl st in next sc, rep around. (4 petals)
Rnd 3: In ch-4 sp work: sc, hdc, dc, hdc, sc, in tr work: sc, ch 4, sc, rep around.
Continue following rose motif pattern from Rnd 5 to create matching granny square base.
Granny Square C – Layered Flower Motif
Foundation Ring: Ch 5, join to form ring.
Rnd 1: Ch 1, 10 sc in ring, join. (10 sc)
Rnd 2: Ch 2, sl st in next sc, rep around. (5 small loops)
Rnd 3: In ch-2 loop work: sc, 3 hdc, sc, rep around. (5 small petals)
Rnd 4 (Behind petals): Ch 4, sc in sc between petals from Rnd 1, rep around. (5 ch-4 loops)
Rnd 5: In ch-4 loop work: sc, hdc, 5 dc, hdc, sc, rep around. (5 large petals)
Continue with granny square base following established pattern.
Granny Square D – Sunburst Motif
Foundation Ring: Ch 6, join to form ring.
Rnd 1: Ch 3 (counts as dc), 15 dc in ring, join. (16 dc)
Rnd 2: Ch 1, sc in same st, ch 5, skip 1 dc, sc in next dc, rep around, end ch 5, join. (8 ch-5 loops)
Rnd 3: In ch-5 loop work: sc, hdc, 5 dc, hdc, sc, rep around. (8 petals)
Continue with granny square base following established pattern.

Joining the Squares
Method 1 – Whip Stitch Join:
- Place squares in desired arrangement (2×2 grid)
- With wrong sides together, whip stitch along edges
- Work through back loops only for invisible seam
Method 2 – Join-as-You-Go: Complete first square entirely. On subsequent squares, join during final round by working slip stitches into corresponding stitches of completed squares.
Border and Finishing
Border Rnd 1: Join yarn in any corner, ch 1, work sc evenly around entire pillow front, working 3 sc in each corner, join.
Border Rnd 2: Ch 3, dc in each sc around, working (2 dc, ch 2, 2 dc) in corner sc, join.
Border Rnd 3: Ch 1, sc in each dc around, working 3 sc in each corner ch-2 sp, join. Fasten off.
Back Panel Construction
Piece 1: Ch 67 Work in dc for 35 rows. (Creates 16″ x 10″ panel)
Piece 2: Ch 67
Work in dc for 30 rows. (Creates 16″ x 8.5″ panel)
Hem both pieces: Sc along one long edge of each piece for clean finish.
Assembly
- Block front panel to 16″ x 16″
- Place back pieces on front with hemmed edges overlapping in center
- Pin carefully ensuring all edges align
- Single crochet around entire perimeter, working through all layers
- Add corner tassels before final weaving in of ends
Tassel Instructions
Materials per tassel: 30 yards of yarn, 4″ cardboard square
- Wrap yarn around cardboard 60 times
- Tie tightly at one edge with 12″ strand
- Cut opposite edge to create 4″ strands
- Wrap binding 1″ from top with separate yarn strand
- Trim evenly and attach to pillow corner
- Repeat for remaining three corners
Customization & Variation Ideas
This versatile pattern offers endless opportunities for personalization and creative expression:
Color Combinations
While the classic cream shown is timelessly elegant, consider these beautiful alternatives:
- Monochromatic Blues: Navy, sky blue, powder blue gradient
- Autumn Harvest: Rust, gold, cream, and burnt orange
- Spring Garden: Soft pink, sage green, lavender, and cream
- Modern Neutrals: Charcoal, light gray, cream, and white
- Boho Brights: Terracotta, mustard, sage, and cream
Pattern Variations
- All Matching Squares: Use the same floral motif for all four squares
- Two-Pattern Design: Alternate between two complementary motifs
- Color-Block Squares: Use different colors for each square
- Ombré Effect: Gradually change shades across the four squares
Size Modifications
- Mini Version: 12″ x 12″ using smaller squares for accent pillows
- Lumbar Style: 12″ x 20″ rectangular using six squares
- Floor Cushion: 24″ x 24″ using nine large squares
- Throw Pillow Set: Make multiple pillows in coordinating colors
Embellishment Options
- French Knots: Add texture to flower centers
- Embroidered Details: Highlight petals with contrasting thread
- Button Centers: Vintage buttons as flower focal points
- Fringe Border: Replace tassels with continuous fringe trim
Styling & Usage Suggestions
This boho granny square pillow brings versatility and handmade charm to any decorating scheme:
Living Room Applications
Sofa Styling: Mix with solid-colored pillows in complementary tones, or create a set of coordinating handmade pillows for a cohesive look. The neutral color works beautifully with both warm and cool color palettes.
Reading Nook: Perfect for creating cozy corners where the handmade details add warmth and personality. Pair with soft throws and good lighting for the ultimate relaxation space.
Bedroom Decor
Bed Styling: Use as accent pillows on beds, mixing with standard pillows and shams. The delicate floral motifs add feminine touches without being overwhelming.
Window Seat: Create inviting seating areas by combining these pillows with coordinating cushions and throws.
Seasonal Adaptations
Spring/Summer: Emphasize the light, airy quality by pairing with white linens and fresh flowers Fall/Winter: Layer with richer textures like wool throws and darker accent colors
This pillow also makes an exceptional housewarming gift, wedding present, or special occasion gift for anyone who appreciates handmade home decor.
Skill Level Assessment
Difficulty Rating: Intermediate
Prerequisites:
- Solid understanding of basic crochet stitches (sc, hdc, dc, tr)
- Experience with working in rounds
- Familiarity with granny square construction
- Ability to read complex pattern instructions
- Basic understanding of blocking and finishing techniques
New Skills You’ll Learn:
- Dimensional floral motif construction
- Multiple square joining techniques
- Professional pillow cover assembly
- Tassel making and attachment
- Advanced finishing methods for home decor items
Estimated Completion Time: 18-25 hours depending on experience level
This project is ideal for crocheters who have mastered basic granny squares and are ready to explore more complex motif work. The skills learned here translate beautifully to blankets, wall hangings, and other home decor projects.
Project Applications
Home Decor Enhancement
This pillow cover represents an affordable way to add handmade luxury to your living space. The timeless design ensures it won’t go out of style, making it a worthwhile investment in your home’s aesthetic.
Gift-Giving Excellence
Perfect Recipients: New homeowners, friends redecorating, family members who appreciate handmade items Special Occasions: Housewarming parties, weddings, holidays, or milestone celebrations Presentation Ideas: Package with care instructions and a photo of the pillow in a styled setting
Skill Building Journey
This pattern serves as an excellent bridge between basic granny square projects and more complex home decor items. The techniques learned here will enhance your ability to create professional-quality handmade furnishings.
Business Opportunities
Market Appeal: High perceived value for handmade home decor Custom Options: Offer color matching services for existing decor Wholesale Potential: Partner with local boutiques or interior designers Online Sales: Instagram-worthy design perfect for social media marketing
Charitable Contributions
Consider donating these pillows to:
- Women’s Shelters: Provide comfort and beauty in temporary housing
- Senior Centers: Brighten common areas with handmade touches
- Hospital Waiting Areas: Offer comfort to families during difficult times
Transform Your Space with Handmade Beauty
This boho granny square pillow cover crochet pattern offers the perfect combination of traditional techniques and contemporary style. Whether you’re creating a signature piece for your own home or crafting a meaningful gift, this pattern guides you through every step of making a truly professional-quality pillow cover.
The combination of intricate floral motifs, classic granny square construction, and playful tassel details creates a piece that’s both timeless and on-trend. The neutral colorway ensures versatility while the handmade details add that special touch that makes a house feel like home.
Ready to start your project? Gather your materials and prepare to fall in love with the meditative process of creating these beautiful floral squares. Each motif offers its own rewards, and watching them come together into a cohesive design is incredibly satisfying.
Pattern difficulty: Intermediate | Estimated time: 18-25 hours | Yarn weight: Worsted (4) | Hook size: 5.0mm | Finished size: 16″ x 16″
